Preparing for configuration
Before starting your Stripe configuration, make sure you obtain the following information from the Vida team prior:- Your Reseller Id (Used for configuring the webhook URL)
- API Key
- PublishableKey
- Webhook Signing Key
- Product Plan Id (per agent plan)
- Price Id (per agent plan)
What the integration covers
- Creating new subscriptions through Stripes hosted checkout
- Cancelling subscriptions
- Subscription renewals
- Upgrading / Downgrading Plans in a subscription
- Adding usage overages to pending invoices
- Creating a secure portal session between your customers and Stripe for managing payment methods and invoices
- Account activation based on subscription activation and successful payment
- Create new customer in Stripe if they don’t exist
- Will use existing customer if we find one based on email address
New subscriptions
Through your Vida reseller portal, customers can subscribe to your agent product plans and be redirect to Stripe’s hosted checkout session (secure checkout). This will collect the customer’s payment information and create a new subscription under the Stripe customer profile. If the payment succeeds, Stripe will inform the Vida platform the account is paid and apply the requested plan. Note: If the customer account in Stripe already has other active subscriptions for your other products, Vida creates a new subscription as to not interfere with your policies on that subscription.Cancelling subscriptions
Subscriptions can be cancelled by a few different methods:- Customer disables their account on the Vida platform
- Customer cancels their plan through the Vida billing settings
- You cancel the subscription manually through Stripe
- Stripe is set to automatically cancel the subscription if payment is uncollectible after the payment retry period.
Subscription Renewals
Stripe manages the subscripton renewals itself. By default, Vida subscriptions renew on the anniversary day of when the subscription was created. If a subscription was created on April 5th, then the subscription will renew on May 5th. When the subscription renews, Stripe informs the Vida platform a new billing cycle has begun which allows Vida to provide current and previous billing period ranges on our usage screens.Upgrading or Downgrading Plans
When a customer wants to upgrade or downgrade their Agent plan, Vida automatically switches the plan in the existing subscription. On upgrades, Stripe will charge the prorated amount of the new plan immediately to bring the balance where it should be. On downgrades, Stripe may be configured to credit customer account the amount instead of refunding. This would be applied on the next billing cycle.Adding usage overages to pending invoices
As a customer’s usage progresses through the month, when the next billing cycle happens, we will grab the usage from the previous billing period (previous month) and determine if any usage overages are due. Overages are any product items you have configured for their plan and they have consumed an amount that exceeds any included amount. These charges are then pushed to Stripe’s pending invoice so payment can be collected.Configurating Stripe and Connecting to Vida
This section covers configuring Stripe to prepare for the integration with Vida. We’ll be covering:- Creating the Product Plans and Pricing
- Enabling Hosted Checkout
- Enabling Customer Portal (Payment Method Management and Invoices)
- Configuring Webhooks to Vida platform
- Creating API Keys
- Configure Failed Payment Settings
Creating the Product Plans and Pricing
After you have already worked with the Vida team to create your agent product plans (agent plan creation and management coming soon to the reseller portal!), we will need to create the product plans and pricing in Stripe. We’ll then need to take the product plan Id and price Id and configure it on your agent product plan in the Vida platform.In your Stripe account:
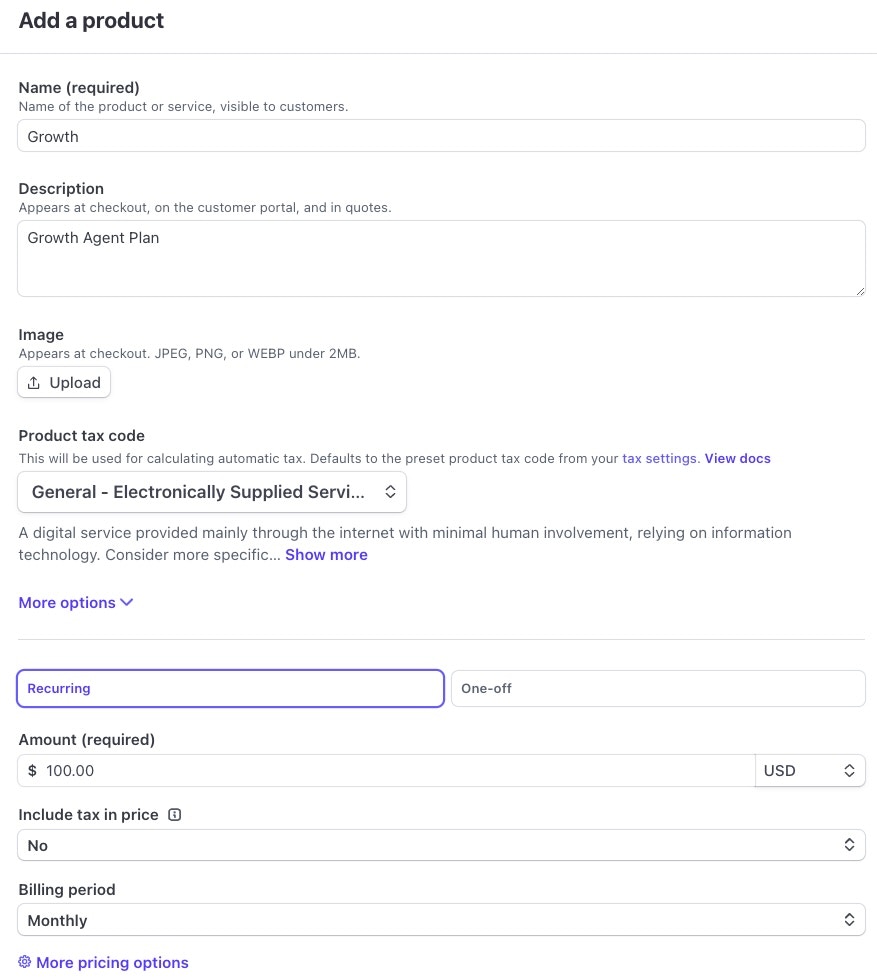
- Navigate to **Product Catalog **and click “+Create product ” button
- Name: This should match the plan name you provided in your Vida Agent plan
- Description: This is a friendly description that your customers will see on the checkout screen
- Click “Recurring” box right above amount
- Set the Amount to the plan’s dollar amount that matches the amount you have set on the Vida agent plan
- Billing Period: Set to “Monthly”
- Click “Add Product” button to create the product plan
-
Note: Vida does not provide any tax advice on how to charge taxation to your products.
- After you click create, we will need to collect both the product Id and the price Id
3. This will bring you to the Product Catalog screen. Grab the product Id and the Price Id for the plan. Click on the product you just created.
- The product Id is on the right under Details. Click the copy button to get the product Id associated with this plan.
- The price Id can be obtained by clicking the ”…” next to the price in the Pricing section and click “Copy price id”
- Repeat these steps for any other agent products you created with Vida. Provide both the Product Id and the Price id to the Vida team to complete the agent product plan configuration.
Enabling Hosted Checkout
Vida uses Stripe’s hosted checkout when customers choose an initial plan in the Agent platform. Hosted Checkout is enabled by default. But you may want to customize the Checkout screen to give your branding (logo, etc).- Go to the Gear Icon on the top right to access settings, then Business -> Branding Tab-> Checkout & Payment Links tab. Vida uses embedded by default but it’s good practice to udpate both Stripe Hosted and Embedded.
Enabling Customer Portal (Payment Method Management and Invoices)
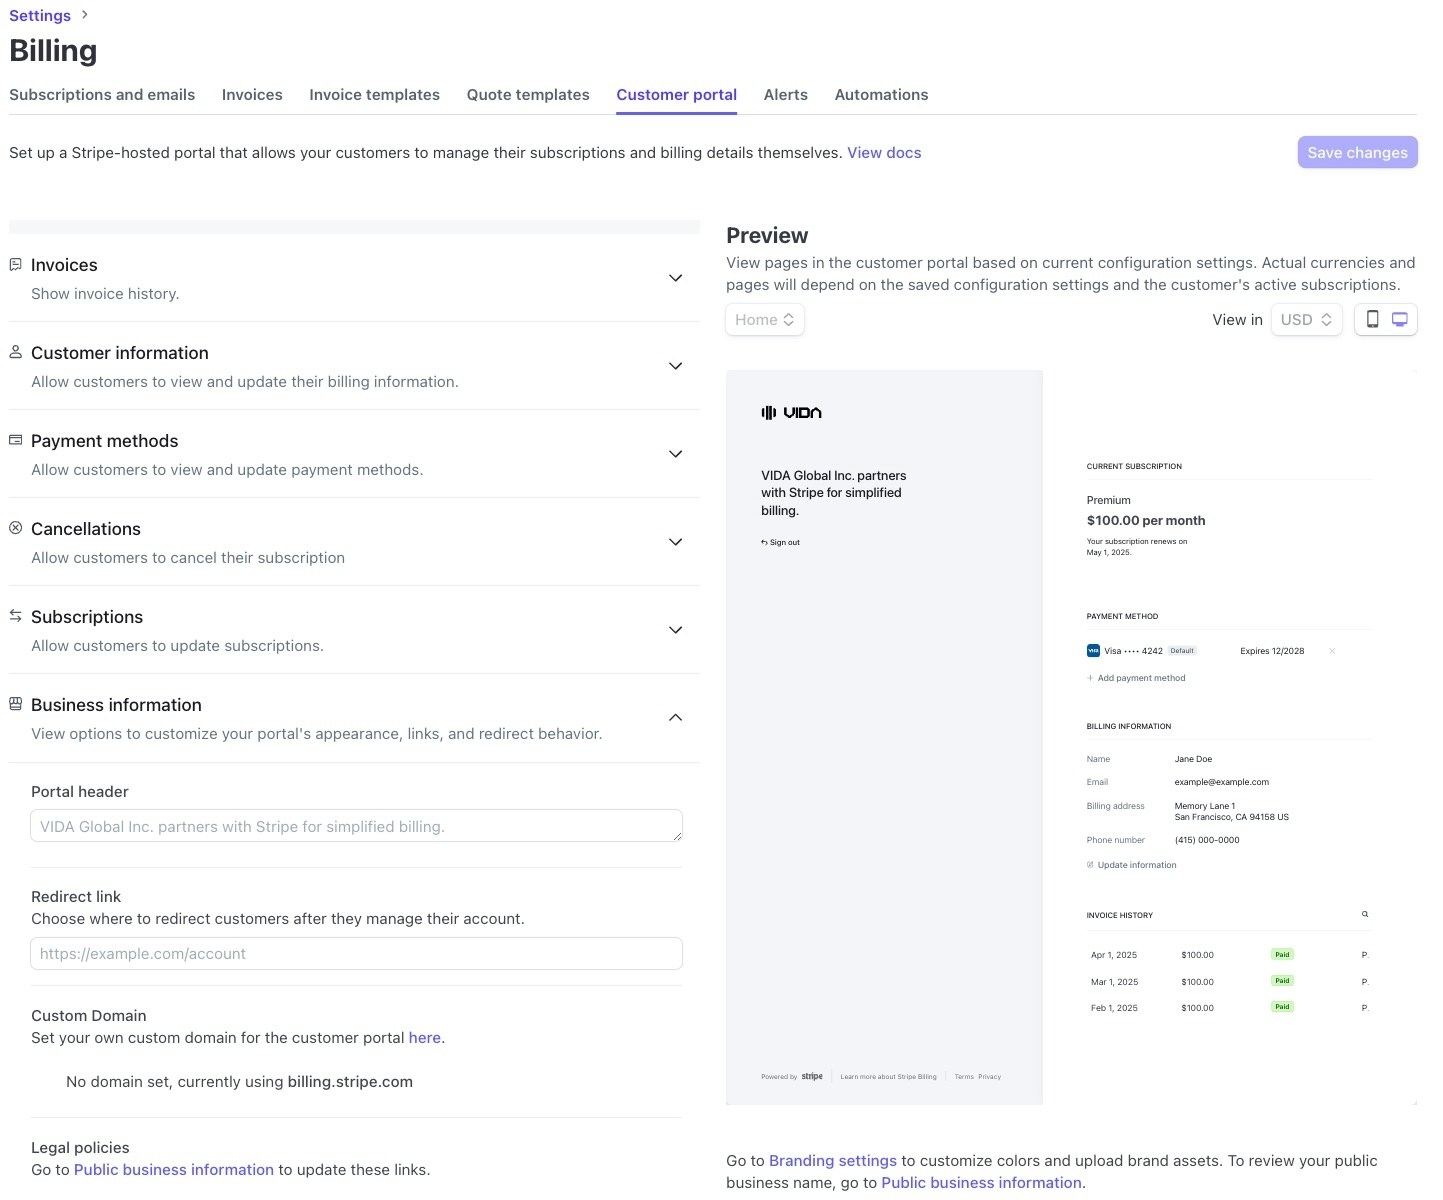
Vida uses Stripe’s customer portal feature to allow user’s to securely manage their payment methods and view invoices. This is not enabled by default.
- To enable the Customer Portal feature, navigate to Settings (Gear Icon) -> Billing -> Customer portal tab.
- Under Invoices, toggle Invoice history to enabled
- Under Customer information, enable Customer infromation and allow the attributes you want them to be able to change.
- Under Payment methods, enable Payment methods
- Under Cancellations, it’s recommended to toggle this to disabled and allow them to only cancel through your Vida reseller portal.
- Under Subscriptions, it’s recommended to disable these settings if possible to avoid allowing them to switch plans/quantity to a product not configured on Vida.
- Under Business Information, these items are optional. Vida’s platform will handle all the Redirect link when it creates portal sessions.
- Click Save Changes button\
Configuring Webhooks to Vida platform
Lastly, let’s configure the communication link between Stripe and Vida. This will allow Vida to receive the events from Stripe when payments or subscription events occur.- Click on the **Developers **button on the bottom left of the portal.
- Click on the Webhooks tab then click + Add endpoint button
-
Endpoint URL: [https://api.vida.dev/stripe/events?resellerId=YOUR_RESELLER_ID
IMPORTANT: Obtain your resellerId from Vida to complete this step. Your final WebhookURL would look like this if your resellerId was 555555: https://api.vida.dev/stripe/events?resellerId=555555 - Set Listen to to the Events on your account
- Set Version to 2020-08-27
-
Click the + Select events button. Vida requires the following events:
checkout.session.completed
charge.succeeded
charge.failed
customer.updated
customer.subscription.deleted
customer.subscription.updated
customer.subscription.created
invoice.payment_failed
invoice.overdue
invoice.paid
invoice.marked_uncollectible
invoice.created
(12 events total) - Click Add endpoint button to finish the configuration
- After the endpoint is added, obtain the webhook signing key by clicking on the new endpoint you just created and clicking Reveal under the Signing secret in the top section. Provide this as the webhook signing key to Vida.
Creating API Keys
Lastly, we need to configure the API keys (API Key and PublishableKey) so that Vida can connect to your Stripe instance.- Navigate to Developers in the bottom right of the portal
- Click API Keys tab
- By default, Stripe creates two keys in your account. The Publishable key and a Secret key. Provide these keys to Vida.
Configure Failed Payment Settings
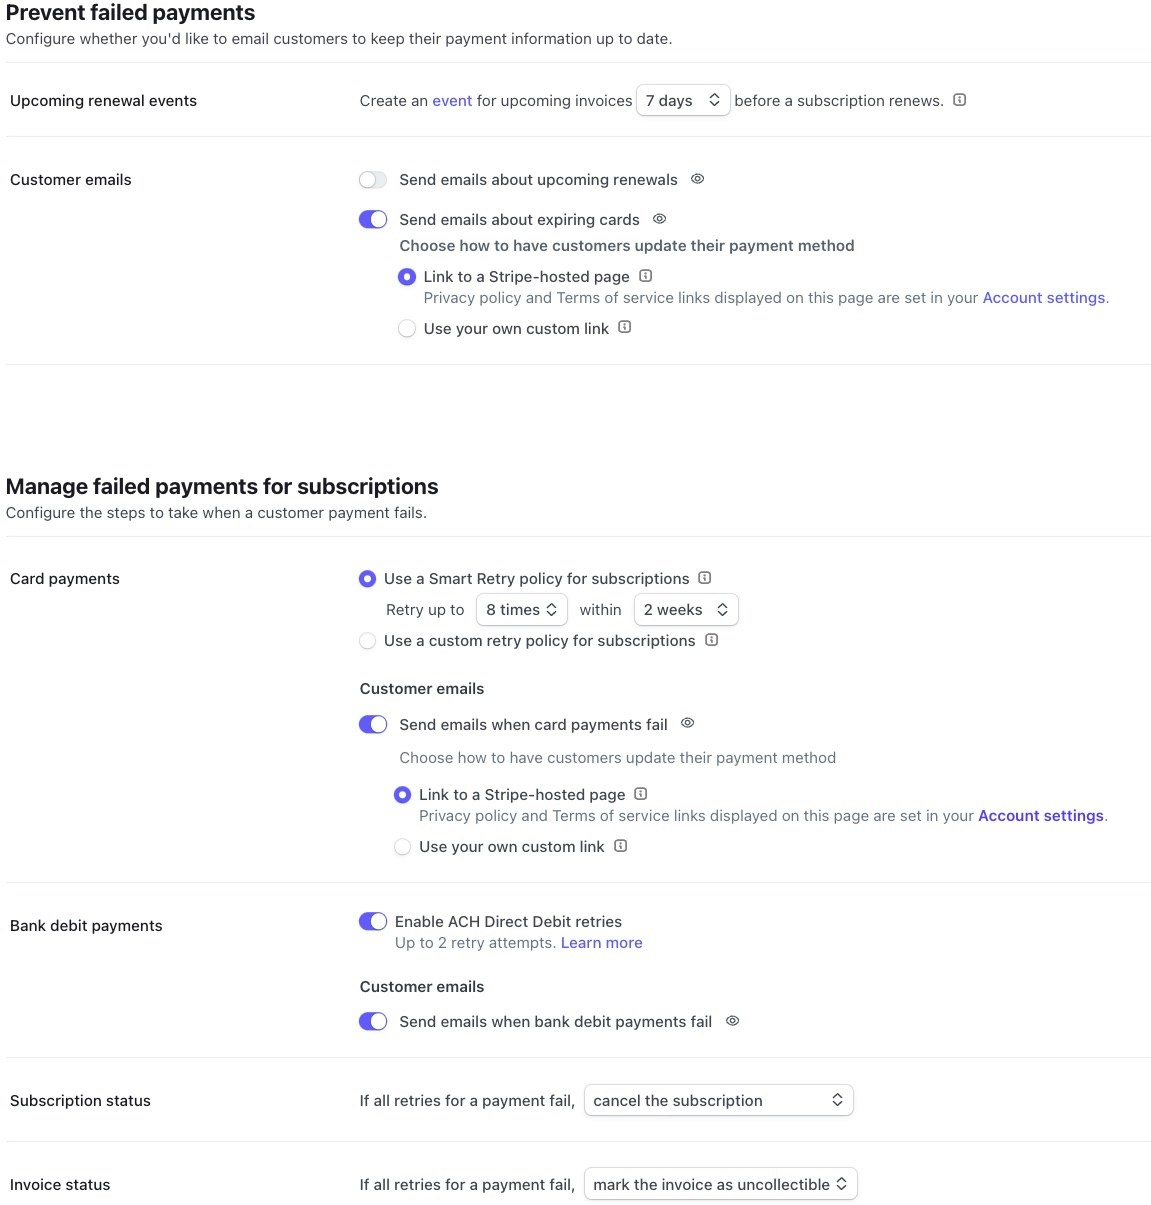
Stripe will handle collection of payment after an attempted payment of an invoice failes. You can configure how long an account remains in a past due state and how often Stripe tries to re-attempt the payment.Here is where you also configure what Stripe does with the subscription when it has exhaused all retries. For instance, if all payment retries have failed, you may want Stripe to automatically cancel the subscription. This would trigger the Vida platform to put the account in an unpaid state and release all of the phone numbers from the agents. Vida recommends this if you do not want to manage the collection itself and wish your customer’s agents to be shutdown if payment can not be collected. Below is Vida’s recommendation but please use the settings best for your business practice.
To configure the Failed Payment settings, go to Settings (Gear Icon) -> Billing -> Subscription and emails tab.
- Prevent failed Payments
- Enable Send emails about expiring cards with Link to a Stripe-hosted page
- Manage failed payments for subscriptions
- Select Use a Smart Retry Policy for subscriptions and Retry up to 8 times within 2 weeks
- Enable Send emails when card payment fail with Link to a Stripe-hosted page
- Set If all retries for a payment fail to cancel the subscription
- Set If all retries for a payment fail to mark the invoice as uncollectible
- Manage invoices sent to customers
- Enable Send finalized invioces and credit notes to customers
Ensure to hit Save for each section where you have made changes.
- Enable Send finalized invioces and credit notes to customers